If you need to set lesson dates for many students at once, use Calendar Mode from Step 4: Schedule on the Assign Word List form. Calendar Mode lets you bulk schedule by lesson, by student, or through the Smart Scheduler wizard — without clicking every cell in the table one by one.
Step 1: Go to Word Lists and open your assignment
- From your Teacher Dashboard, click Word Lists in the left sidebar.
- Open the Lists Assigned to Students tab to see word lists already assigned to your class.
- To schedule dates, open an existing assignment:
- Click Settings on the group card, then Edit Assignment, or
- Click the group card and choose Edit Assignment in the What do you want to edit? modal.
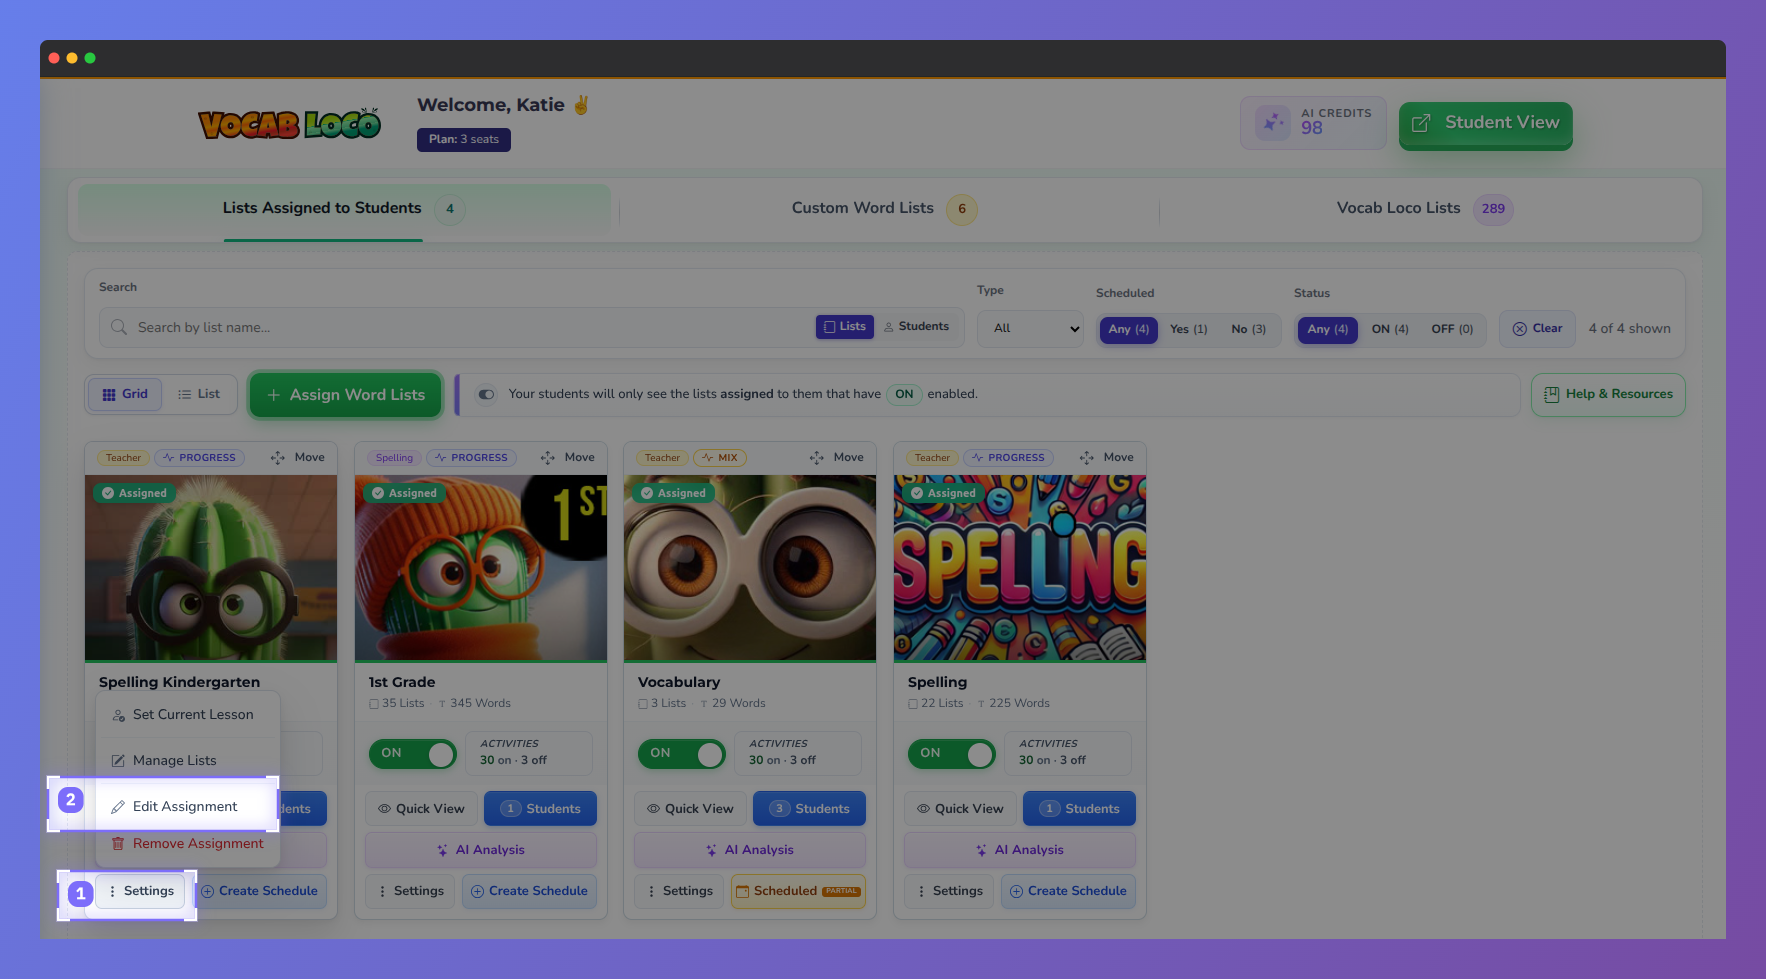
Screenshot of the Vocab Loco Teacher Dashboard showing the assigned word lists management.
Step 2: Open Step 4: Schedule
- In the Assign Word List form, use the step navigation to go to Step 4: Schedule.
- This step is where you set start and end dates so students know when each lesson is available.
- If you are assigning a list for the first time, click Assign Word Lists, complete Step 1 (word list) and Step 2 (students), then continue through Step 3 (activities) until you reach Step 4.
Important: Once you schedule at least one lesson in a group, only lessons with a scheduled start and end date will appear for students. Other lessons in the same group that do not have dates scheduled will not appear until you schedule them as well.
Reminder: Students only see word lists that are assigned to them and turned ON. Lists that are turned off will not appear for students, even if you schedule dates on Step 4.
Step 3: Open Calendar Mode
- On Step 4, find the action bar above the schedule table.
- Click Calendar Mode (calendar icon) on the right side.
- A full-screen scheduling grid opens: students on the left, lessons across the top, and each cell is where you set that lesson’s dates for that student.
- Press Esc or click the close button to exit Calendar Mode and return to Step 4.

Screenshot of the Vocab Loco Assign Word List workflow showing the multi-step assignment process.
Step 4: Bulk schedule lessons and students
In Calendar Mode, you can bulk schedule in three ways:
- Option A — Bulk lessons (one lesson, all students): At the top of a lesson column, click Bulk lessons. Enter a start date and end date, choose Apply to (e.g., All students), select a policy (Merge, Replace, or Skip), then click Apply. The same dates are applied to every student for that lesson.
- Option B — Bulk schedule (one student, all lessons): On a student row, click Bulk schedule. Enter start and end dates, choose Apply to (e.g., All lessons), set your policy, then click Apply. The same dates are applied to every lesson for that student.
- Option C — Smart Scheduler (many lessons and many students): Click Smart Schedulerat the top of Calendar Mode. Follow the wizard:
- Choose all lessons or pick specific lessons.
- Choose all students or select specific students (you can filter by group or search by name).
- Pick a scheduling style: a single day, a week, or a date range.
- Choose a policy: Merge (keep existing dates and add new ones), Replace (overwrite), or Skip (only fill empty cells).
- Review the summary and click Apply changes.

Screenshot of the Vocab Loco Smart Scheduler interface showing classroom word list scheduling tools.
Policy quick guide:
- Merge — Keeps existing schedules and adds or updates where needed.
- Replace — Removes existing schedules in the selected scope, then applies the new dates.
- Skip — Only schedules cells that are still empty; leaves existing dates unchanged.
Pro Tip: Use Smart Scheduler (Option C) when you are setting up a new unit for the whole class. Use Bulk lessons (Option A) when every student should work on the same list during the same week. If you want every lesson in the group visible to students, schedule all lessons in the group — not just one.
Step 5: Save your assignment
- Close Calendar Mode to return to Step 4 on the assign form.
- Review the schedule table on Step 4 if needed.
- Click Save on the assign form so your schedules are stored.
- Confirm the list is ON on the Lists Assigned to Students tab so students can see it.
Q: Do I need to schedule every student one at a time?
A: No. Use Bulk lessons, Bulk schedule, or Smart Scheduler in Calendar Mode to apply dates to many students and lessons at once. You can also select students on Step 4 and use Bulk Schedule Selected before opening Calendar Mode.
Q: Why don’t my students see every lesson in the group?
A: After you schedule at least one lesson, only lessons with both a start and end date appear for students. Schedule the remaining lessons in the group, or use Smart Scheduler to apply dates to all lessons at once. Also confirm the list is assigned, turned ON, and saved.
Was this article helpful?
That’s Great!
Thank you for your feedback
Sorry! We couldn't be helpful
Thank you for your feedback
Feedback sent
We appreciate your effort and will try to fix the article